OBD code information sheet
https://dvireports.com/p0420
Catalyst efficiency below threshold — bank 1
Selected definitionGeneral catalogue definition1 definitions availableChange
Choose the make reported by the scan tool or vehicle documentation. The same code can have different manufacturer meanings.
Technical explanation
The emissions monitor reports catalyst efficiency below its calibrated threshold on bank 1. Check misfires, exhaust leaks and oxygen sensors before replacing the catalyst.
Read the full technical explanation
P0420 sets when the bank 1 catalyst monitor estimates conversion efficiency below its engine-specific threshold. Many petrol systems evaluate upstream and downstream feedback under controlled monitor conditions, but a similar-looking sensor trace alone does not prove the catalyst has failed. Misfire, mixture errors, exhaust leaks, contamination and feedback faults need exclusion before replacement. Monitor design, sensor technology and enable conditions are vehicle-specific.
Symptoms
Engine warning, often with normal apparent drivability.
Consumption or rough running when mixture or misfire faults coexist; P0420 alone does not establish catalyst blockage.
Emission-test failure is possible; unusual odor or loss of power needs separate root-cause diagnosis.
Top suspects — what to check first
Suggested checking order, not statistical failure rates or a confirmed diagnosis. Priority can change with the engine and associated codes.
Degraded catalytic converter
Check firstEfficiency falls with mileage, especially on engines burning oil or with long-standing misfires.
Exhaust leak before the sensor
Check nextAir drawn in through a crack makes the downstream sensor look like a dead catalyst.
Slow or aged downstream O2 sensor
Check nextA lazy sensor mimics the signal of an inefficient catalyst.
Other possible causes
Rich mixture, misfires or oil burning
Case-dependentThe real cause may be upstream; a new catalyst will degrade again.
All causes in the technical record
Some causes overlap with the shortlist above; this is not a probability ranking.
- Aged, overheated, physically damaged or poisoned bank 1 catalyst.
- Misfire or incorrect fuel mixture affecting catalyst operation and durability; oil/coolant entering the exhaust.
- Exhaust leaks around sampling locations, ahead of or near the catalyst.
- Upstream/downstream sensor, heater or wiring fault; wrong component or ECU strategy requiring vehicle-specific verification.
How to test — practical steps
Start with simple checks before buying parts. This is not a VIN-specific workshop procedure; keep clear of moving parts, fuel pressure and energized circuits.
- 1
Record codes and look for misfires / mixture faults
Save P0420 freeze-frame and related DTCs, then identify bank 1 and the catalyst system from VIN service data. Correct active P030x misfires or P017x/mixture faults first because these can distort the monitor and harm the catalyst.
- 2
Check engine running and oil consumption
Check running quality, active misfire data, abnormal mixture control and oil/coolant consumption. An ongoing contamination source can damage a replacement catalyst unless fixed.
- 3
Inspect the exhaust only after cooling
With the exhaust cool, inspect sealing at the manifold, joints and sensor positions. Air ingress ahead of a feedback sensor can distort its signal; fix proven leaks and reassess before condemning the catalyst.
- 4
Identify upstream and downstream sensor types
Identify actual upstream/downstream sensor technology (narrowband, wideband/A/F, etc.) and connector topology. Implausible or ECU-substituted data must not be read as catalyst efficiency from a graph.
Detailed tests / equipment needed (advanced)
Perform only tests for which you have the correct wiring diagram, equipment and training.
Compare the two oxygen sensors
You need:Scan tool with O2 sensor graphs
- Identify the upstream and downstream sensor types and OEM test conditions first; narrowband switching rules do not apply to wideband sensors.
- Observe signals and catalyst monitor status under the specified conditions; expected behaviour depends on sensor design and ECU strategy.
- Similar signals can guide investigation but do not alone prove catalyst failure; first rule out misfires, fuel-control faults and exhaust leaks.
- Check misfires, fuel trims and exhaust tightness first.
What you should see: Evaluate catalyst monitor results using OEM procedures for the installed sensors; do not apply universal O2-voltage rules.
Do not replace the catalyst before ruling out exhaust leaks and misfires.
Check exhaust tightness
You need:TorchHeat-resistant gloves
- With the engine cold, inspect the flanges between manifold, catalyst and silencer.
- Look for black soot traces and a puffing noise at idle.
- Check for cracks on the catalyst body, especially at welds.
What you should see: No cracks or soot traces. A small leak before the sensor can set P0420 on its own.
Component location sketch
Technical references for verification
- Ford — petrol catalyst monitor, prerequisites and permanent-code monitoring principles
- DENSO — oxygen-sensor contamination and systematic exhaust checks
- HELLA — oxygen-sensor testing and technology differences
- DENSO lambda sensors: upstream control and downstream catalyst monitoring in petrol three-way catalyst systems
Full technical diagnosis — additional checks
Step-by-step diagnosis
ChecksWork through the steps before replacing parts. Adapt the checks to the manufacturer’s procedure.
1. Save P0420 freeze-frame and related DTCs, then identify bank 1 and the catalyst system from VIN service data. Correct active P030x misfires or P017x/mixture faults first because these can distort the monitor and harm the catalyst.
2. Check running quality, active misfire data, abnormal mixture control and oil/coolant consumption. An ongoing contamination source can damage a replacement catalyst unless fixed.
3. With the exhaust cool, inspect sealing at the manifold, joints and sensor positions. Air ingress ahead of a feedback sensor can distort its signal; fix proven leaks and reassess before condemning the catalyst.
4. Identify actual upstream/downstream sensor technology (narrowband, wideband/A/F, etc.) and connector topology. Implausible or ECU-substituted data must not be read as catalyst efficiency from a graph.
5. Diagnose sensor/heater DTCs, supplies, grounds, connections and harness according to OEM information. Heater or signal-circuit failure calls for electrical repair, not automatic catalyst replacement.
6. Under the monitor's actual enable conditions, compare feedback behavior and available monitor results. Downstream following upstream may support low conversion only after confirming sensors, exhaust sealing and mixture performance.
7. When feedback looks contradictory, evaluate response time and authorized mixture-response tests with suitable equipment. Slow or missing reaction calls for sensor/circuit diagnosis ahead of catalyst decisions.
8. Where applicable inspect substrate damage, overheating and contamination, and determine why it happened. HELLA documents P0420 alongside misfire on Toyota Aygo 1KR-FE; that vehicle-specific case is not a universal cause.
9. Perform an OEM-defined catalyst functional/oxygen-storage test only where the procedure exists. Out-of-limit efficiency after other faults are excluded can justify the correct bank 1 catalyst, not trial oxygen-sensor changes.
10. Confirm no remaining misfire, leaks or fueling faults and complete the catalyst monitor after repair. Permanent DTCs can remain until a successful monitor cycle; flashing MIL, severe misfire or exhaust overheating require a safe stop.
Components to check
This list does not confirm failed components and is not a replacement recommendation. Verify the fault cause and vehicle applicability first.
- Bank 1 catalyst only after an OEM-defined performance failure and correction of the original cause.
- Upstream/downstream sensors, heaters or wiring only after their fault is demonstrated.
- Exhaust joints/seals and parts responsible for misfire or oil/coolant consumption, following diagnosis.
Make- and engine-specific notes
Documented configurations, not proven common defects for all makes or engines. Selecting a vehicle narrows the results.
Context guides without confirmed OEM exceptions
These explain the code for named vehicle configurations, without proving a part is defective or a cause is more common.
Notes are diagnostic leads, not proven faults or disassembly instructions. Do not work on brakes, fuel systems or hot components without proper training.
Check the fuses before ordering a part
An OBD code describes a detected condition; it does not tell you which part to replace. Start with the fuse for the affected circuit.
If the fuse is good, carry on like this:
- Check the relevant supplies and connectionsWhere the diagnostic procedure calls for electrical checks, verify supply, ground and connectors under the manufacturer’s activation conditions.
- Run the specified component testUse the manufacturer’s test for this code and component before deciding it has failed.
- Order only after the fault is demonstratedReplace a part only when the prescribed tests identify it as defective.
Check details
- Identify the circuit and any relevant fuse: Confirm the vehicle, engine, code meaning and stored operating conditions first. A fuse link is a location aid, not evidence that the fuse caused this code. Use the specified type and rating; do not repeatedly replace a fuse that opens.
- Check the relevant supplies and connections: Use the specified engine state, circuit conditions and expected values. Have live measurements performed by someone qualified. For non-electrical faults, follow the relevant mechanical, fluid, pressure or leak checks instead.
- Run the specified component test: Do not apply a generic resistance range. Any resistance or continuity test requires a de-energized circuit and an isolated component, with the correct pins and temperature from the procedure. Some components need a different kind of test.
- Order only after the fault is demonstrated: If results are normal, continue the relevant wiring, control, mechanical or intermittent diagnosis. Check for related faults and verify the repair under the required conditions. A code or a completed checklist alone does not justify replacement.
If the procedure involves airbag/SRS, pretensioners or a high-voltage system, stop DIY testing and use qualified service. Do not probe these circuits with a multimeter.
Vehicle experiences and cases
User-reported cases published after moderation. Approval does not verify the diagnosis; the same code can have different causes.
No experiences have been published for this definition yet. You can be the first to share the checks and outcome.
See all vehicle experiencesManuals, components and vehicle guides
Find the relevant procedure in the workshop manual for your vehicle. A fault code alone does not identify a failed part, powertrain or exact schematic.
Vehicle guides covering this code
These vehicles have authored contextual guides; this is not a highest-risk ranking. Confirm generation and engine code before using the procedures.
Manuals open at their original source. Exact diagram availability depends on the build year, engine and manufacturer access.
System and diagnostic diagrams
Conceptual illustrations of the system; verify the actual configuration and tests in vehicle-specific documentation.
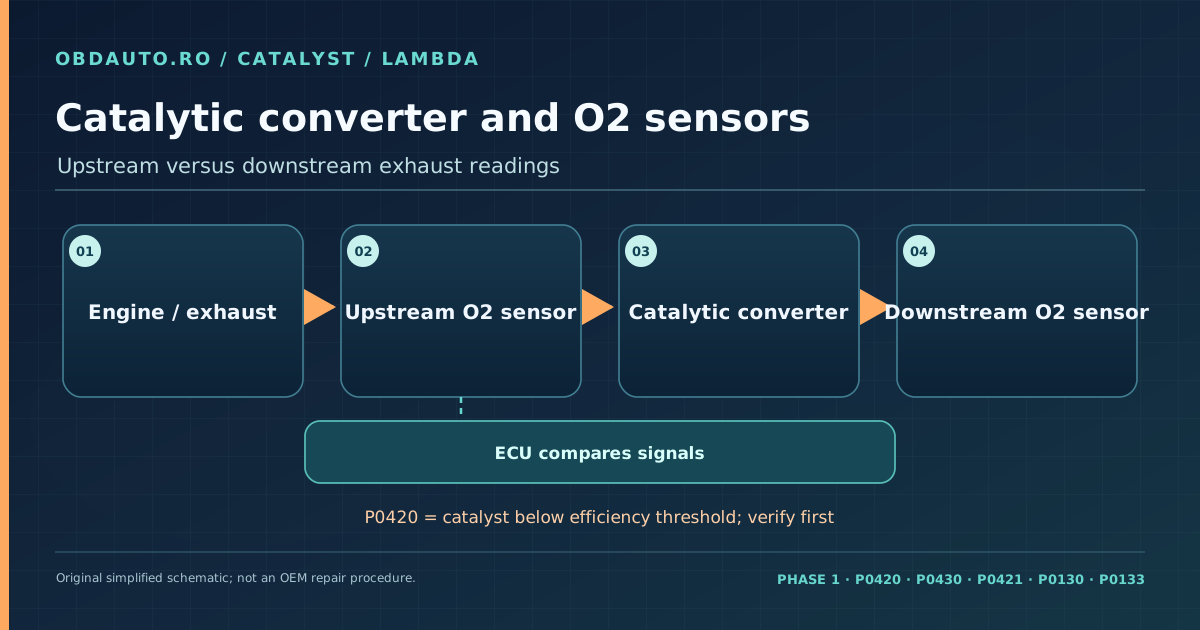
Catalytic converter and O2 sensors
Upstream versus downstream exhaust readings. Original conceptual diagram, not an exact component location or an OEM repair procedure.
View full-size diagram →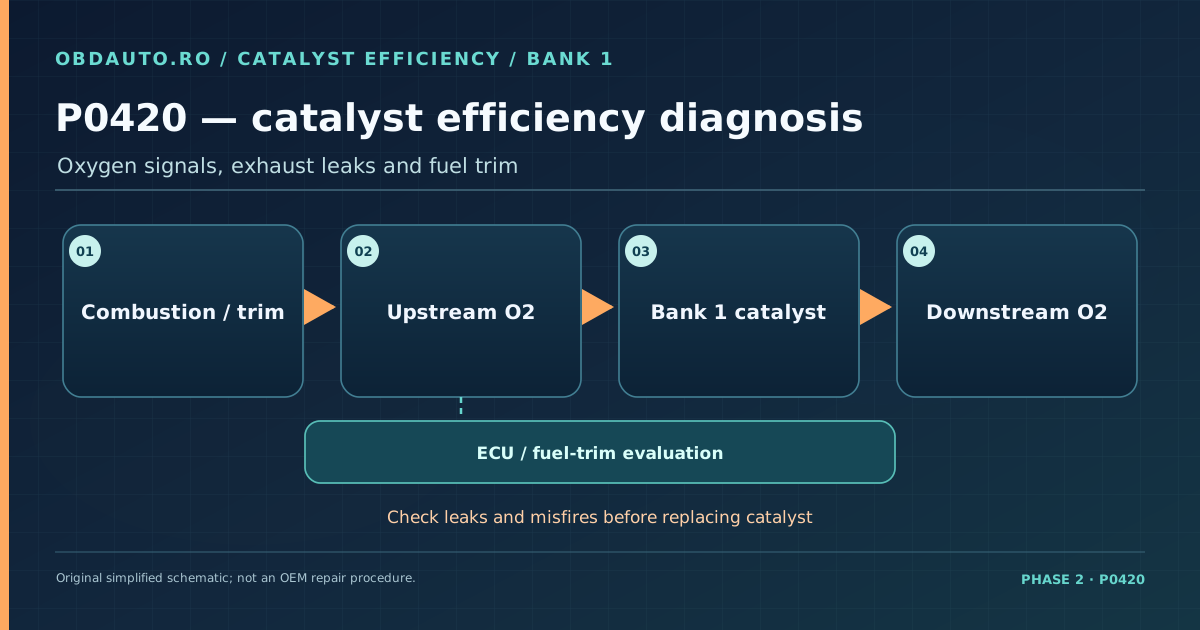
P0420 — catalyst efficiency diagnosis
Oxygen signals, exhaust leaks and fuel trim. Original conceptual diagram, not an exact component location or an OEM repair procedure.
View full-size diagram →How to fix P0420: step-by-step guide
Symptoms, causes, visual inspection, scan-tool or multimeter tests, replacement and clearing the code, with safety warnings.
Catalyst efficiency
General system guidance · not a confirmed diagnosis
An efficiency code alone does not establish replacement; investigate conditions that damage or confuse monitoring of the catalyst.
The association is based on the imported description. This information explains the system; it does not confirm a procedure for the exact code, model or engine. Verify applicability in manufacturer documentation.
Checks for this type of system
- Check misfires, mixture and oil consumption first.
- Have exhaust integrity and sensors checked for the installed monitor.
Useful diagnostic data, where available
- Efficiency monitor state.
- Upstream/downstream signals interpreted for sensor technology.
Normal values and thresholds vary by vehicle and are not assumed here.
Mistakes to avoid
- Do not apply one voltage rule to every engine.
- An unrepaired engine fault can damage a replacement catalyst.
System-guide sources
References support general principles, not individual verification of every associated code.
Vehicle associations in the catalogue
Catalogue associations help searching and do not confirm code applicability for every model, year and engine combination. Check the vehicle service information.
Make
Model
Year
Engine
Continue your research
Links to related systems, warning lights and vehicle examples.
Similar codes
General code
EGR A Flow
Emissions & exhaust · EGR
General code
Exhaust gas recirculation flow insufficient
Emissions & exhaust · EGR
General code
Exhaust gas recirculation flow excessive
Emissions & exhaust · EGR
Individually documented guide
The definition and diagnostic guidance were verified for this exact code identity.
Report a problem
Is this code showing on your vehicle?
See the code meaning and catalogue checks for free. Continue with contextual AI analysis on a PRO plan.
Interpret this code in context.
Describe symptoms, add up to 3 photos and scanner codes if available. Get AI guidance, a PDF and a link for your mechanic — RON 5 / USD 2 / EUR 2 / GBP 1 per case, no subscription.
Vehicle reportsFree: 5 reports a month
Want to send this diagnosis to your customer or keep it in a clean PDF with your logo?
Generate a complete report: OBD codes, findings, photos and recommendations, with your workshop details. You can import the codes straight from a photo of the scan tool.
- Your logo and workshop details
- Import codes from a photo
- Photos and findings
- 13 languages and the customer's currency
5 free reports every month; try it straight away, no subscription.